You'll capture your brand's look in MoodyBoards, then use Claude Code — an AI that builds software from plain-English instructions — to turn that moodboard into a real, on-brand website. No experience needed.
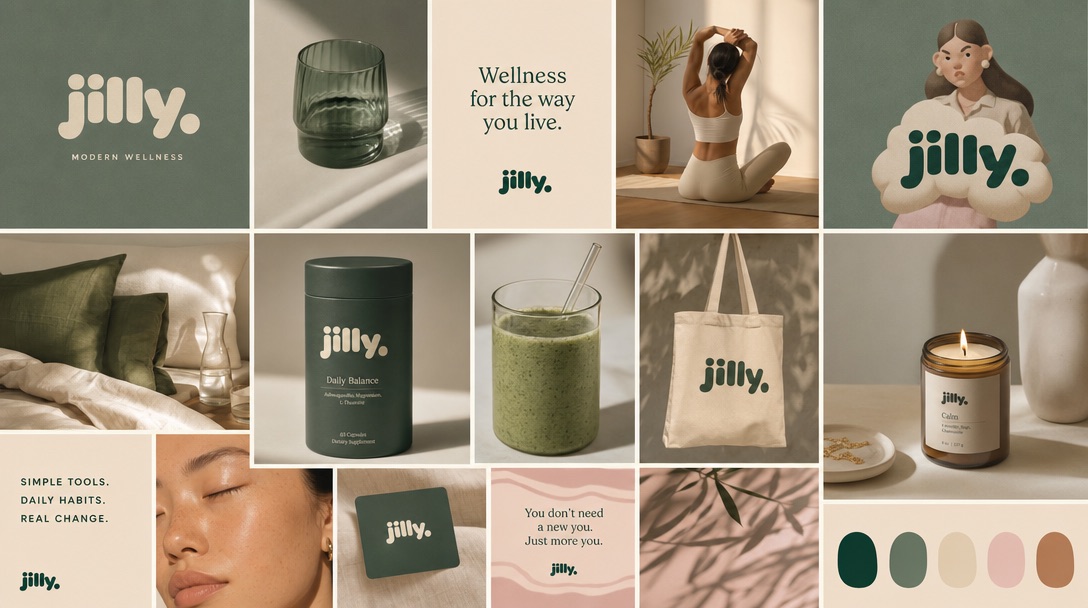
Every example in this course comes from one real brand: Jilly, a wellness brand made in MoodyBoards. Wherever you see the ✦ Jilly tag, you're looking at the real thing — the actual brief, the actual prompts, the actual mistake and fix, the actual finished website. Nothing mocked up. This is Jilly's moodboard:
The starting point: one moodboard, made in MoodyBoards. By lesson 7 it's a live website.
Never written a line of code? Perfect — that's exactly who this is for. You'll describe what you want in plain English, the way you'd brief a designer or write an email. You don't need to know what any of the technical words mean to get a result.
What you'll learn
In seven short lessons you'll go from a moodboard to a real, on-brand website — no code, no jargon. By the end you'll be able to:
✓Set up your brand in MoodyBoards and generate your images
✓Open Claude Code on your computer — it’s a chat, not a coding tool
✓Brief an AI builder in plain English, like talking to a designer
✓Turn your moodboard into a website that matches your brand
✓Refine it, save it, and put it online
How it works: two tools, one handoff
The whole thing rests on a simple idea — MoodyBoards and Claude Code are two separate tools that pass the work between them:
1MoodyBoards
You make a moodboard — palette, fonts, mood, images. Your look, decided.
→
2Build your website
One button turns your whole project into a written brief. The bridge between the two.
→
3Claude Code
Anthropic's AI builder. You give it the brief, it builds the website — matched to your moodboard.
So: MoodyBoards decides how it looks, Claude Code builds it, and the Build your website button connects them. The lessons below walk you through it, start to finish.
Everything starts in MoodyBoards. Sign up free, start a board, and describe your brand in a sentence — what it is, and how it should feel. That's all the setup there is.
✦ Jilly — our example brand
Jilly — the project this course follows — started as exactly one sentence:
A modern wellness brand. Sophisticated and warm
From that, MoodyBoards' AI generated the moodboard you saw a moment ago — the palette, the type direction, the mood, the imagery. Your look, decided in about a minute.
Then generate your project images
This is the step people skip, and it's the one that makes your website feel real. On your board, generate the AI images your site will actually use — product shots, lifestyle photos, whatever your business needs. Every image automatically inherits your board's style. Jilly's were made with prompts as simple as:
a woman doing yoga, no text
A product shot for a new Jilly product called "Jilly Bath Bomb"
Notice how plain those are — and the small clarifications doing real work. Image models love to put words in pictures, so adding "no text" keeps an image clean; if you do want words, say exactly what they should say. Making a product shot? Name the product. That's all the prompting skill this takes.
Those exact images become the hero, the product cards, and the store section of the website you'll watch get built later in this course. More project images = a richer site.
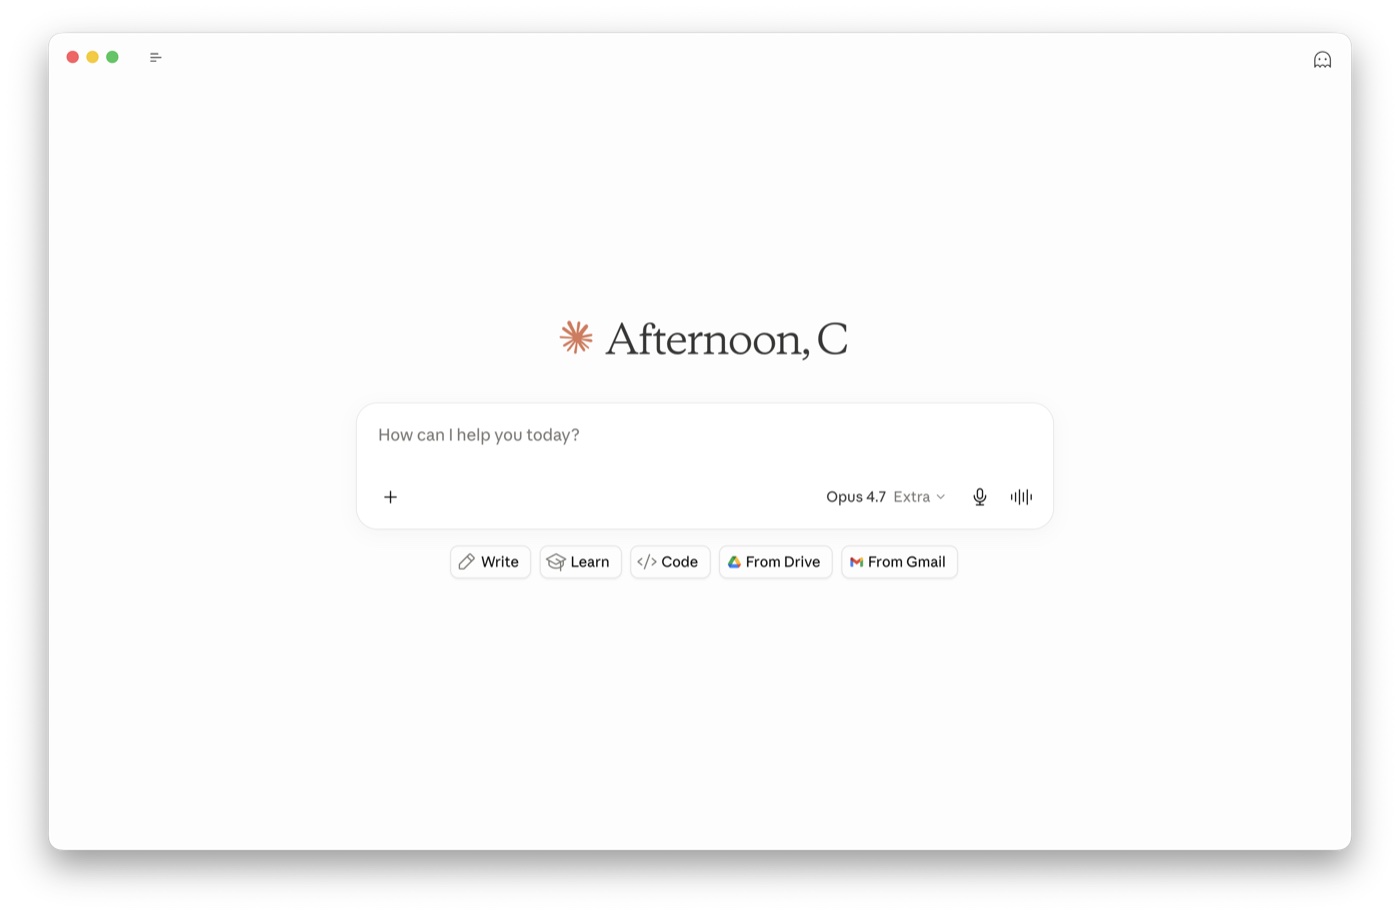
If Claude is new to you: Claude is a popular AI assistant made by Anthropic, and Claude Code is the version that builds things. There is nothing technical about using it — it's a chat window. You write what you want in plain English, and it builds the website.
It's an app for your Mac or Windows computer. Download it at claude.com/download, open it, and sign in. You'll need a Claude Pro, Max, or Team plan — the free plan doesn't include Claude Code.
The Claude desktop app. That's the whole interface — a chat.
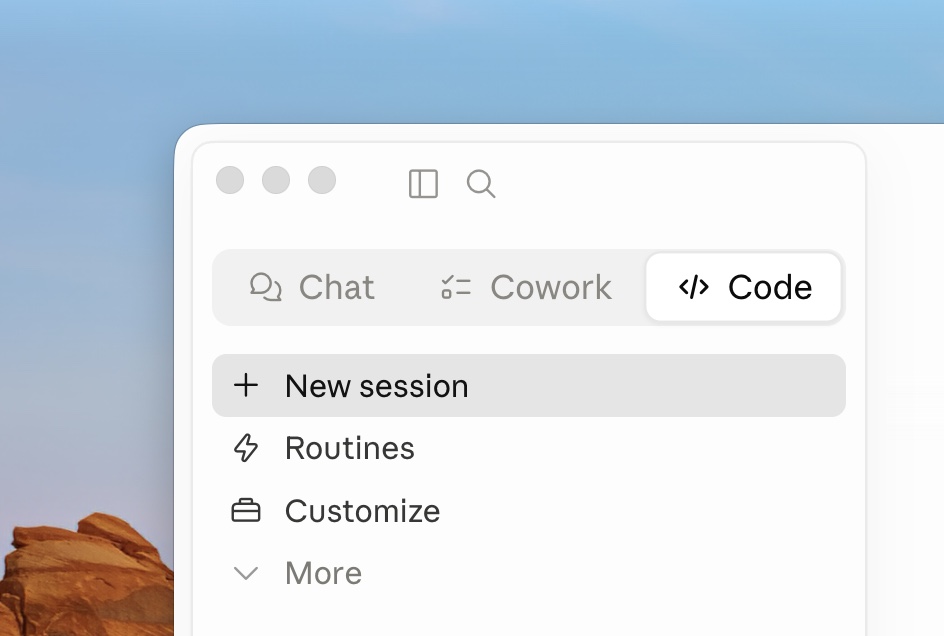
A "project" is just a folder on your computer where your website's files live, kept on its own so nothing gets mixed up.
In the app, switch to the Code tab at the top, then click New session. Pick a fresh, empty folder and give it a name like my-website — everything Claude builds lands in there.
That's it — you're now looking at a chat with Claude Code, ready to go. Not sure what to do? Just ask it — even "what can you do?" — or type /help for the built-in shortcuts.
The Code tab — New session is where every project starts.
This is the whole trick: you describe what you want in normal English. No special syntax. For example:
what's in this folder?
When you ask for a change, Claude Code shows you the proposed edit and asks for your approval before touching anything. You can approve changes one at a time, or turn on "accept all" for a session. Press Shift+Tab to cycle how much it asks.
Brief it like a helpful coworker: say what you're trying to achieve, and let it work out the how. The difference between an okay result and a great one is almost always the brief, not the tool:
Weak"make a website for my brand"No look, no content, no goal. You'll get a competent generic site that could be anyone's.
StrongThe entire brief from the Build your website button — pasted whole.You don't write the strong version — MoodyBoards does. One button bundles the goal, the look, your images, and your business info into a complete prompt. Paste it whole; don't retype or trim it.
Weak"it doesn't look right, fix it"Claude can't see what bothers you. It will guess — and probably change the wrong thing.
Strong"the headline font feels too corporate — it should feel softer and rounder, like the logo in my moodboard"Names the element, names the feeling, points at the reference.
Here's where it clicks. In MoodyBoards, open your project and click Build your website in the sidebar — no need to open any image. One click bundles your whole project into a ready-made brief: your palette, fonts, mood, a suggested layout, and links to every image in the project.
[ Screenshot: the "Build your website" button on a MoodyBoards project ]
We'll drop a real screenshot in here.
✦ Jilly — our example brand
This is the actual brief MoodyBoards generated for Jilly — the exact text, untouched. Notice it's not just colors: it tells Claude Code to study the moodboard first, audit every image's resolution, and ask follow-up questions when it's done. You don't have to write any of this — the button does.
Copy the whole brief and paste it into Claude Code — that's the entire move. Don't retype it, trim it, or summarize it: the brief already tells Claude what to build, what order to work in, and which images to use. If you want something specific, add one line of your own after it, like:
make it a single page with a booking section at the end
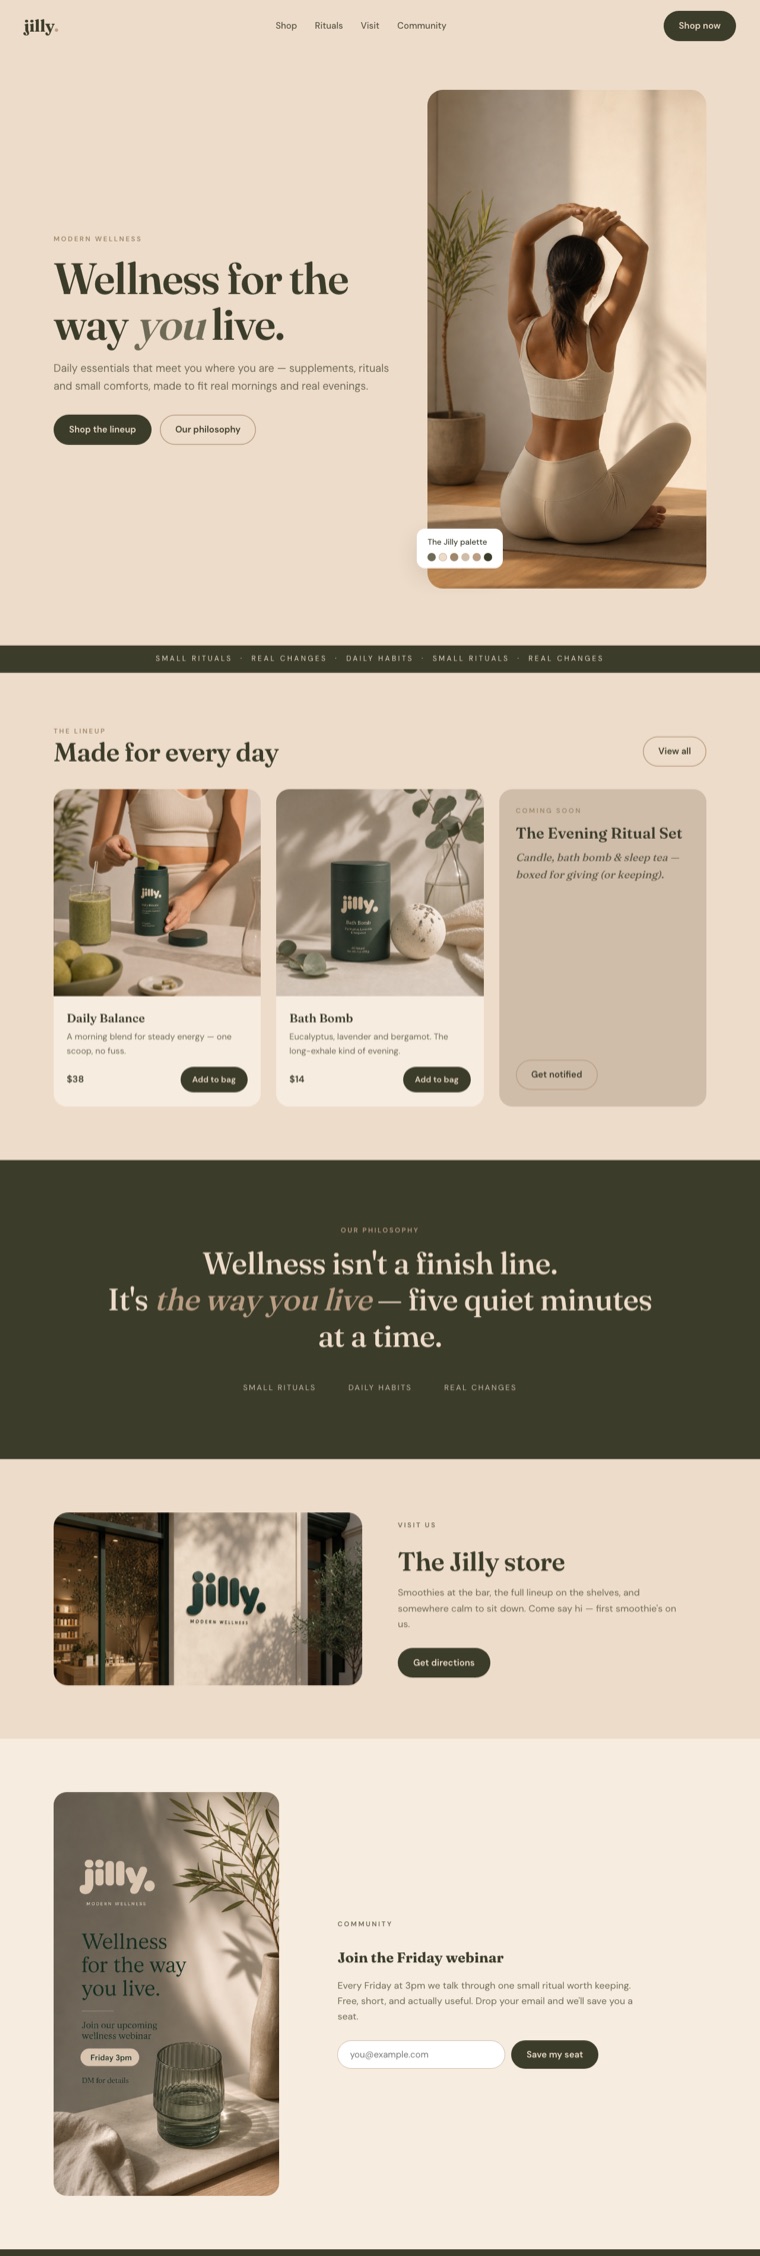
Claude Code pulls down your images, scaffolds the site around your colors and type, and matches the look of your references. Here's what it built for Jilly from that exact brief — one pass, no template:
The hero of the Jilly site, built by Claude Code from the brief above. Real palette, real images, real brand.Open the finished Jilly site live →
Nothing's final. Just keep asking, in plain English:
make the hero taller and center the headline
tighten the spacing between sections
swap section two for a 3-up of features
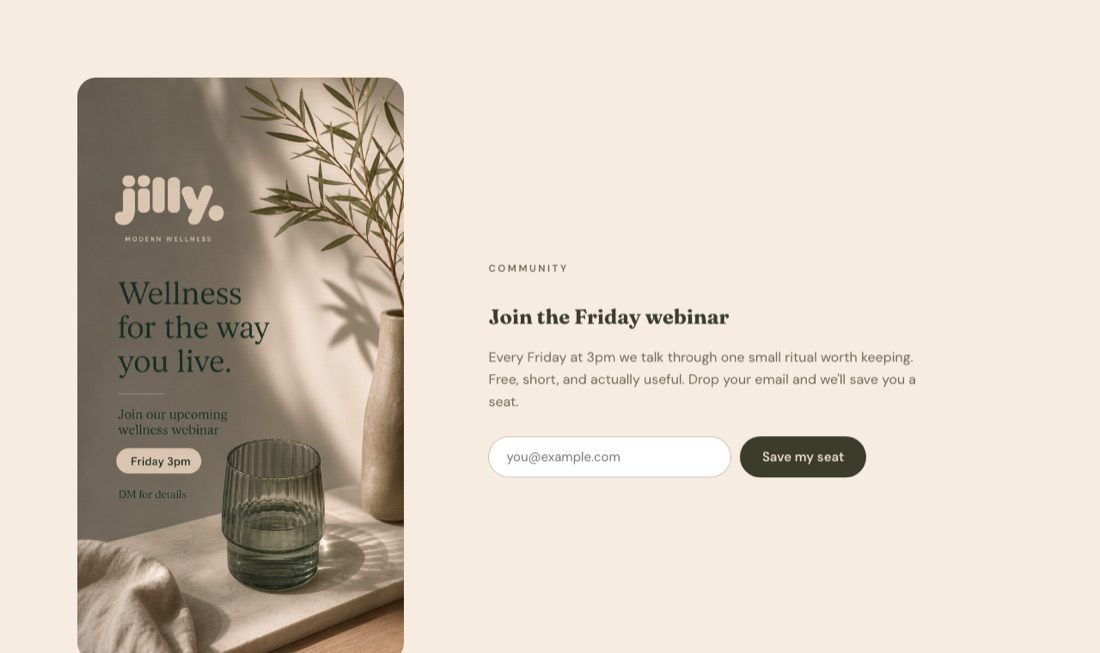
✦ Jilly — our example brand
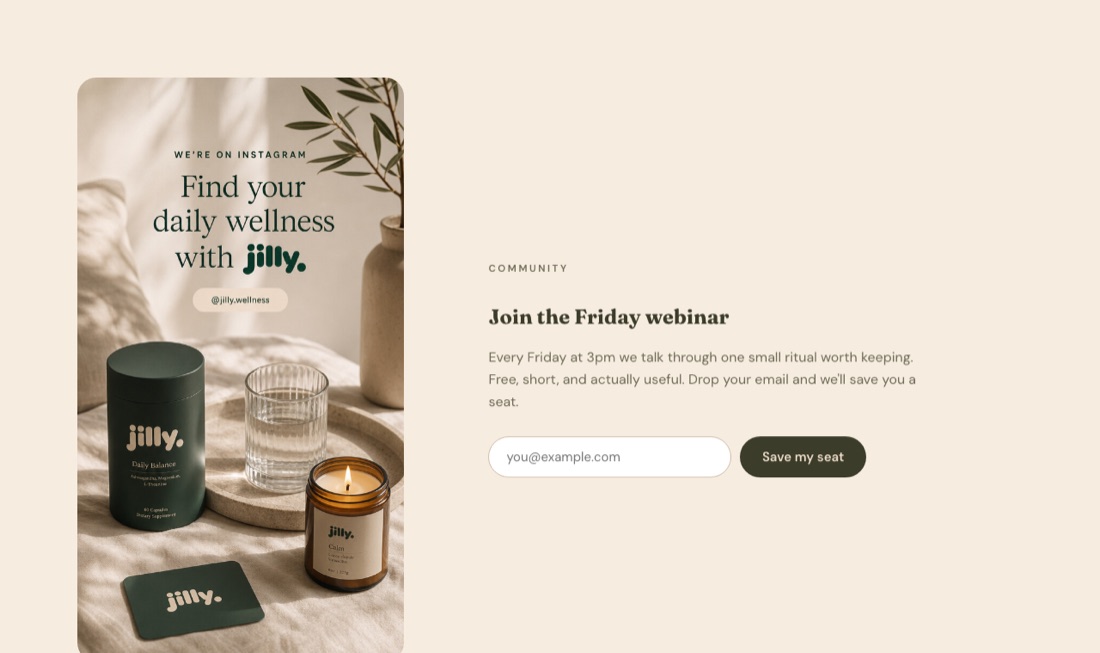
It happened on the Jilly build. First pass, Claude Code put the wrong image in the webinar section — it grabbed the Instagram announcement instead of the webinar poster. One plain-English message fixed it:
the community section is using the Instagram image — swap it
for the webinar poster, the one that says Friday 3pm
BeforeAfter
Note what made that prompt work: it names the section, names the wrong image, and describes the right one. Ten words of specificity, instant fix.
Two tips that make a big difference:
Be specific. "fix the spacing on mobile under the hero" beats "make it nicer."
Go step by step for bigger asks — number the steps and it'll work through them.
Claude Code handles version history conversationally — no commands to memorize:
save my changes with a clear note about what I did
And when you're ready to go live, just ask:
help me put this website online
It'll walk you through it — the easy path is Netlify, which is free to start. Your website is literally a folder on your computer: drag that folder onto Netlify's free Drop page and you're live in under a minute. (Netlify sells domains too — when you're ready, you can buy yourname.com right where you host.) The finish line isn't a file — it's a URL you can text to someone.
✦ Jilly — our example brand
Here's the whole Jilly site — moodboard to live URL. Every image came from the MoodyBoards project, every hex from the palette:
The full page. Compare it to the moodboard from the overview — same brand, instantly.Visit the live Jilly site →
It will, occasionally — and every problem below is fixable with one message. This is the part most tutorials skip; it's also where you stop feeling like a beginner.
"The site doesn't look like my brand"
Claude built something competent but generic. Don't redecorate piece by piece — send it back to the source:
this doesn't match the moodboard. Look at the moodboard image
again and list the 5 biggest differences between it and what
you built — then fix the top 3
"The images look blurry or stretched"
An image is being shown bigger than its real size. There's no fixing a stretched image with more stretching — make Claude check the actual files:
check the real pixel dimensions of every image on the page.
Any image displayed larger than its native size: show it
smaller, or replace that section with a text-led design
"It ignored my palette"
audit every color on the page against the brief's palette.
List anything off-palette and replace it with the closest
hex from the brief
"It changed something I liked"
This is what version history is for. Just say:
undo that last change — the version before was right
"It's confused / going in circles"
Long conversations drift. Type /clear, then re-paste your brief and describe where things stand. A fresh start with a good brief beats a long muddled thread every time.
The pattern in every fix above
Don't describe the symptom and hope — point Claude at the source of truth (the moodboard, the brief, the real file) and tell it to compare. That one habit fixes 90% of misses.
You mostly just talk in plain English. Beyond that, these are the only things worth remembering:
You type
What it does
Plain English
Describe what you want — this is 95% of using it
/help
See everything you can do
/clear
Start a fresh conversation
/
See all commands & shortcuts
Shift+Tab
Change how often it asks before making a change
Prompt recipes — copy, tweak, paste
Proven asks for the website you just built. Each one works because it's specific:
add a simple sticky nav: logo on the left, my section names
in the middle, one button on the right using my accent color
make this look right on a phone — check every section at
375px wide and fix anything cramped or overflowing
add a footer with my logo, the tagline from the brief, and
links to each section. Keep it in the darkest palette color
the hero feels flat — make the headline twice as prominent
and give the section more breathing room
add a simple email signup section near the end. When someone
submits, just show a friendly confirmation — no backend yet
before we finish: check the contrast of every text color on
its background and fix anything hard to read
One pro move: the CLAUDE.md file
As your project grows, ask Claude Code to "create a CLAUDE.md with the key facts about this project." It's a little notes file it reads every session — so it remembers your stack and what you're building without you re-explaining each time.
Make a moodboard, hit Build your website, hand the brief to Claude Code, and iterate until it's yours. You watched it happen for Jilly — the live site is right here. Now go give it a direction worth building.